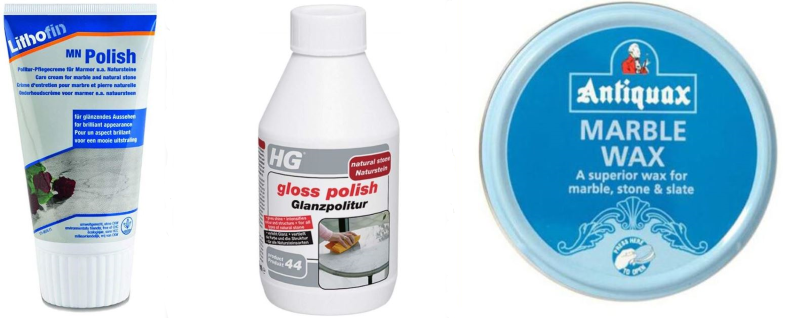
How do you restore a marble vanity top, or how to polish a bathroom countertop? When the marble is relatively new and has little signs of use and no dull spots. A polish like Lithofin MN polish is one of the best to use as it is easy to apply and buff to a shine.
DULL SPOTS
If there are a few dull spots, then a polish like HG Gloss polish is a good choice. You can concentrate this polish on a small area and build it up. When they are less visible you can use the same product to polish the wider area and blend it in. Read my review of HG Gloss Polish where I show you how to polish a dull spot
Both scenarios can be completed as part of your maintenance programme or a DIY project.
3 GOOD MARBLE POLISHES
1. LITHOFIN MN POLISH (READ REVIEW)
2. HG GLOSS POLISH (READ REVIEW)
3. ANTIQUAX, MARBLE WAX
HOW TO APPLY MARBLE POLISH
The general rule when applying any marble polish. You should apply a thin coat, then leave it to settle for about a minute before buffing to a shine. If you try to apply it and work it into the stone to try and make it shine you will only smear the polish. You will also make hard work of it and use more polish than you need to.
ETCHING AND LIGHT SCRATCHES
If your vanity top has some very light damage, like some etching and light scratches etc. There are some very good marble polishing compounds, etch mark removers and marble polishing kits available. They require no special equipment to use but read the manufacturers instructions carefully. Always do a small spot test in an inconspicuous area or better still on a spare piece of marble.
3 PRODUCTS I USE FOR SMALL PROJECTS
1. BRICO Marble Polishing Powder
2. Miracle Sealants, Water Ring & Etch Remover
3. BMC Marble Restore Kit
RESTORING DAMAGED VANITY TOPS
Vanity tops (or bathroom countertops) that have completely lost their shine or have limescale damage. Projects like this should be tackled by a specialist contractor. The three images below are typical examples of a Bathroom Vanity tops that should be restored by a professional. Each one had different areas of damage which had to be addressed.
BOTTICINO MARBLE COUNTERTOP
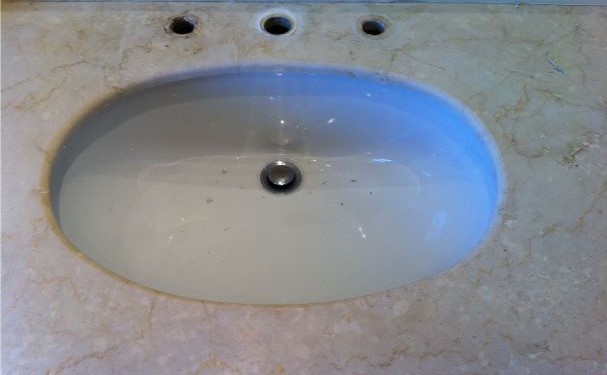
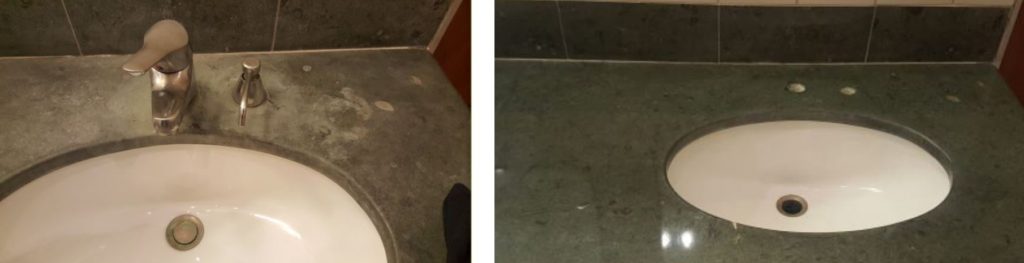
This Botticino marble countertop was installed in a property over 15 years ago. There was a lot of limescale damage which had eaten into the marble. Many years of using the wrong maintenance products had left the surface looking very dull and flat. My client decided to replace the taps with a new set of a similar design. The old taps were removed by a third party.
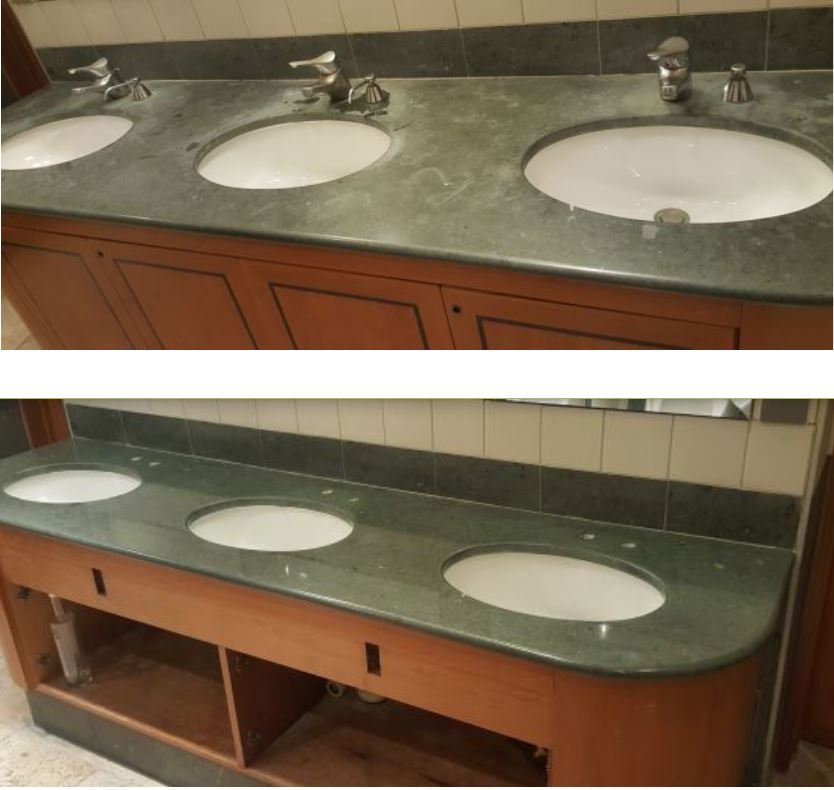
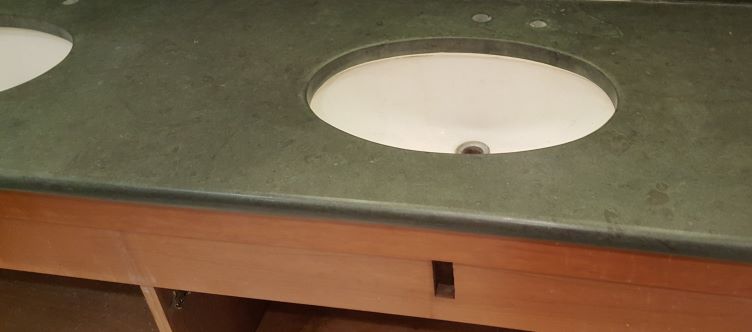
GREEN JURA LIMESTONE TRIPLE VANITY TOP
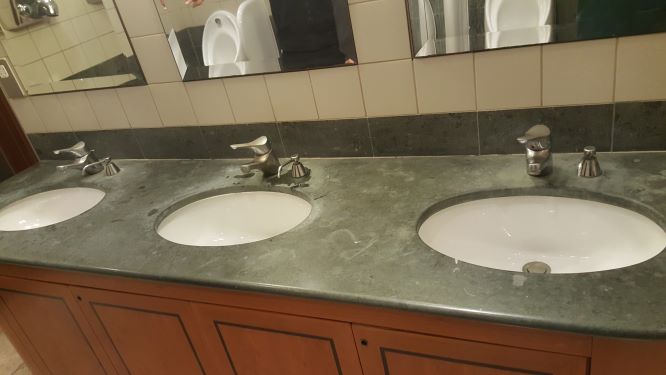
The material is a Green Jura Limestone quarried in Germany. The triple vanity top is in a Central London Hotel near area used for meetings and conferences etc. It is not the sort of material that has deep shine, but it should look better than this. The Limestone had a lot of etch marks and limescale damage around the taps. Most if not all this damaged is caused by leaving water and other substances to dry on the surface.
Vanity tops, particularly in hotels and office building can take a bit of a battering. This is mainly due to the lack of care and awareness by the people using the facilities. This facility had a tiled floor so I was able to use the water fed tools for this project.
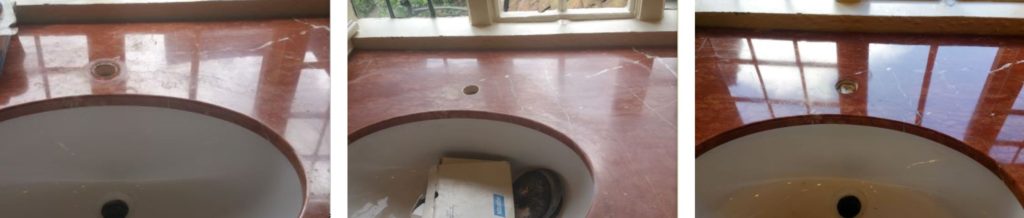
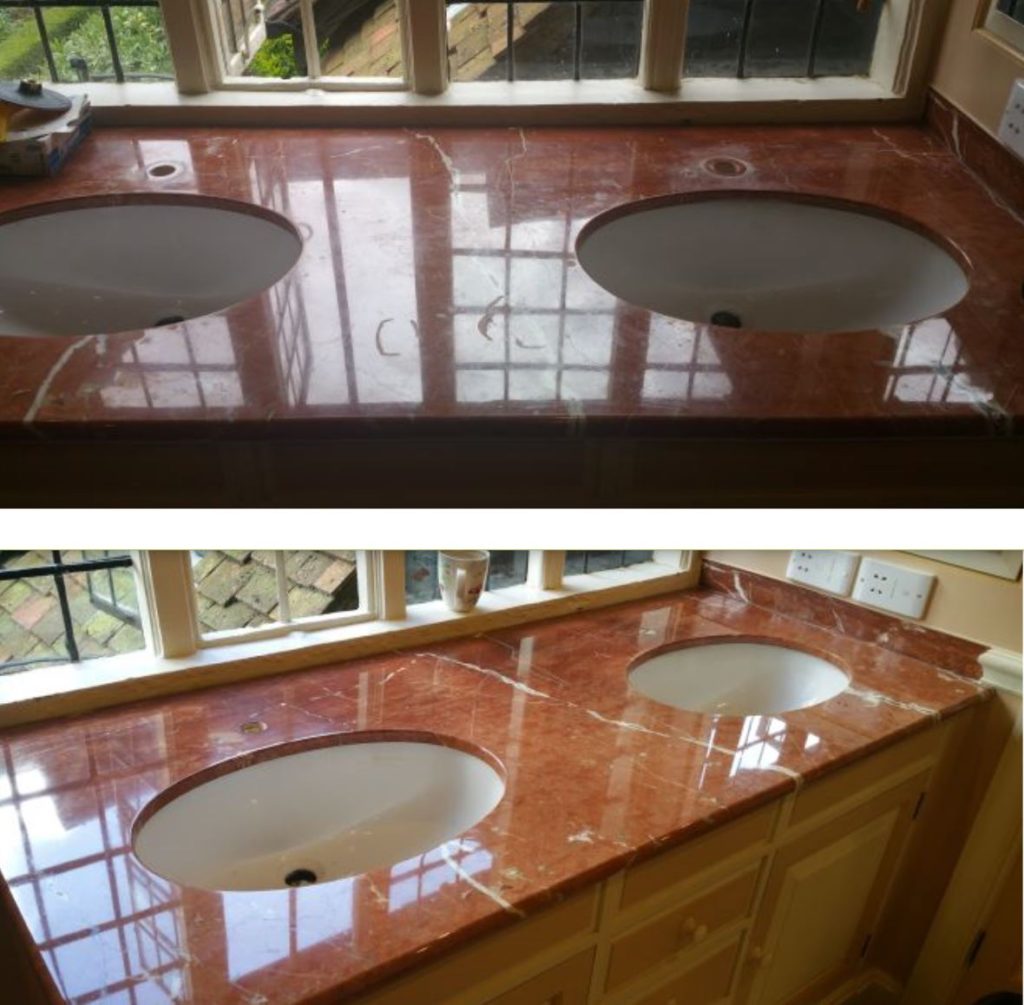
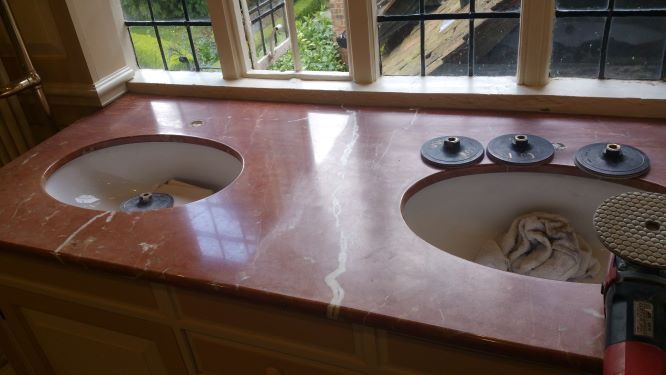
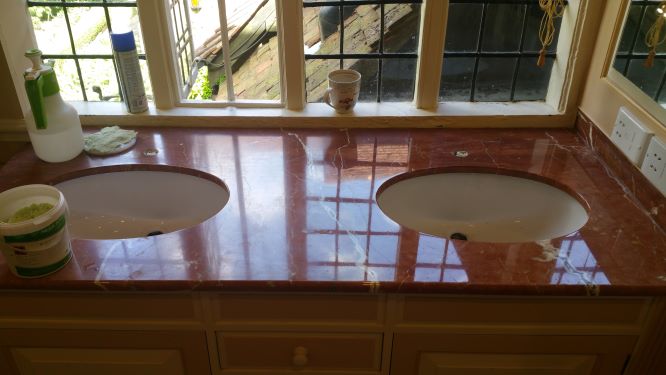
ROSSO ALICANTE (MARBLE) DOUBLE VANITY TOP
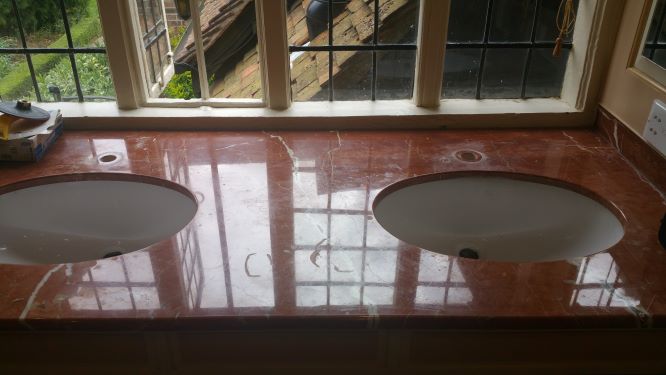
This material is a marble called Rosso Alicante. The vanity top has a good shine which was spoiled by the etch marks in the middle. There was also some light limescale damage around the taps and a few water stains. The flooring in this property was not suitable for the use of my water fed tools. An extractor fan was used together with the dry polishing pads for this project.
This is my process for restoring vanity tops (or bathroom countertops)
ASSESSING THE DAMAGE
Most of my clients like to send me pictures which is a help. However, in most cases, I will need to touch the surface to feel how rough it is. This will help me determine how coarse the first grade of abrasive I will need to use. If the etching is very light a 220 or 400 grit will be good enough to remove the marks. Where the surface has a lot of pitting and scratches to remove. I would need to start with 60 grit or a 120-grit abrasive.
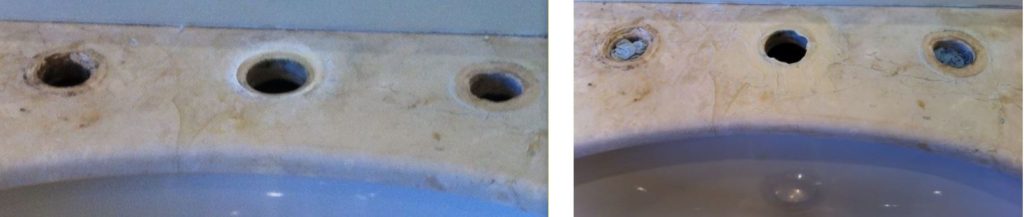
LIMESCALE DAMAGE
The limescale damage around the taps may be so bad that it may be necessary to repair it. A resin-based filler to match the colour of the stone is used to repair the damage.
WORKS ENVIRONMENT
An important thing to consider before starting the project is the surrounding area and floor covering. Most commercial buildings and hotels have a tiled floor, so it is better to use a wet polisher. This keeps the dust down to a minimum.
If it is a small project, or in a private house, I use the dry polisher. The floor and surrounding area may not be suitable for the water fed tools. A constant flow of water is required and there will be some standing water on the floor.
When I use the dry polisher, wherever possible I use an extractor fan to keep the dust levels down. If there is nowhere for the dust to be vented out, I attached a vacuum to the polisher.
Removing the taps
Hardened soap scum and limescale around the taps can be difficult to remove. Whether you are going to re-use the same taps or fit new ones, it is better to remove them first. Most polishing heads are too big to get between the taps and around the back. Also, the gap between the splashback and taps can be very tight.
It is also very difficult to get an even finish in this area if you must work around the taps. I always recommend that the taps are removed by a third party. The waste should be left connected to assist with cleaning etc.
Preparing the area
As well as removing the taps and soap dispensers. I like to protect as much of the surrounding area with plastic dust sheets etc. Cleaning is much easier at the end of a project.
Removing limescale and soap scum
If the limescale and soap scum is very light and has just set on the surface of the stone. A scraper with a new knife blade fitted is the best tool I have found to remove it with. Hardened soap scum and limescale can be removed easier by dampening the area to soften it. Once it is soft you can remove it without damaging the stone. If the limescale has been there for a long time it may well have eaten into the stone. Damage like this will leave the stone looking pitted and feel very rough when you touch it.
Repairing Limescale Damage
In such cases, I remove as much limescale as possible. The surface is then cleaned with white spirit before repairing it with an epoxy resin. It is best to repair this sort of damage rather than just sanding it back. Too too much sanding in this area of the vanity top will result in a dip in the stone. The uneven stone would collect water around the taps, and you would soon have limescale forming around the taps again.
Removing old Seals, Polish and Silicone Sealants
I give the stone a good clean with a concentrated cleaning agent to remove any old polishes and seals. Chemically removing the old seals or polish will assist with the sanding back of the stone in the early stages. I will not have to cut through them before you can get to the stone. Also removing the old finish first may reveal other areas of damage that was masked by the polish or seal. I also like to remove the old silicone sealant between the vanity top and the splash back. This allows me to get right to the very edge of the stone.
Grinding back to a honed finish
Having decided which grit size to start with, I individually remove the worst marks and then using the same grit size grind back the whole area. Once completed the stone will have a nice even honed finish completely free of all pitting and etch marks etc.
Stain removal
At this stage, if there is any deep staining from the use of oil-based products they would show as slightly darker patches. I would then either use a steam cleaner to remove them or a concentrated cleaning agent sometimes both. Some projects, the stains are deep within the stone. In such instances, it is necessary to apply a poultice to remove the stains. Occasionally I leave a poultice on overnight to draw out any deep oil stains.
Medium grade abrasives
The Vanity Top is now free of all etch marks, pitting, limescale, scratches and oil stains etc. Now begins the process of restoring the colour and shine. If I started with a 120-grit size, I would continue the process using a 220 grit and move up through the following grit sizes 400, 600, 800 and finally 1000 at this stage.
Colour Intensifier
When I am restoring the darker marble or limestone vanity tops like Nero Marquina or green coloured Marbles or Limestones. I like to apply a colour Intensifier at this stage. The colour Intensifier only needs to sink into the stone for about an hour before continuing. This product will also protect the stone from any deep staining in the future. The colour Intensifier I use will also seal the stone and protect it from oil-based products. Future cleaning and maintenance of the stone will be easier after applying this product.
The product I like to use for projects like this is HG Colour Intensifier.
Fine and ultra-fine grade abrasives
For the final stage of the sanding process, I then work through the following grades. Grit sizes 1200 or 1500, 2000, 3000 and 6000 and sometimes up to 10,000. From about grit size 2000 you will start to see the colours and veining coming through. At 6000 you will have a good shine at 10,000 the shine is much deeper. If a very deep shine is not necessary, the stone can be polished after the 2000 or 3000 grit sizes.
Polishing powder
A marble polishing powder is mixed with water and worked into the marble with a cloth or soft white nylon pad by hand. The powder and water will form into a slurry as it is worked into the stone. This will take about 2 minutes at which point the slurry should be wiped off with a damp cloth. Immediately after the slurry is removed the area is washed with clean water and dried with a separate cloth.
On some of the darker marbles, it is necessary to repeat this process. Working in small sections of about a foot square at a time until the whole surface is polished. The vanity top will then have a beautiful deep shine and the colours and veining will be more defined. The product I like to use is HULK marble polishing powder from BI Crawshaws.
Silicone Impregnator
On the lighter coloured stones where it is not necessary to apply a colour Intensifier, an impregnator is applied. Silicone impregnators are applied and allowed to sink into the stone. After 5 minutes any product that is left on the surface is removed and the stone is protected. Impregnators should never be allowed to dry on the surface of your stone. When applied correctly the silicone impregnator will make future cleaning and maintenance a lot easier.
Tidying up
Most if not all areas would have been protected with plastic sheeting or dust sheets. Cleaning the area on completion of the works is a straightforward process with minimal moping, vacuuming and dusting down required.
Wax or cream polish and final buff
Finally, before moving off-site I apply a little wax or cream polish and buff the surface with a soft cloth. Before leaving I
BEFORE & AFTER PHOTOS OF THE COMPLETED PROJECTS